Versus Audio Windows Guide: Playback Device, App Mixer, EQ Engine & Per-Game Profiles
Versus Audio on Windows: pick a playback device, use the app mixer without APO, connect Equalizer APO for EQ, save base and per-game executable profiles, then Bypass or Disconnect & restore.
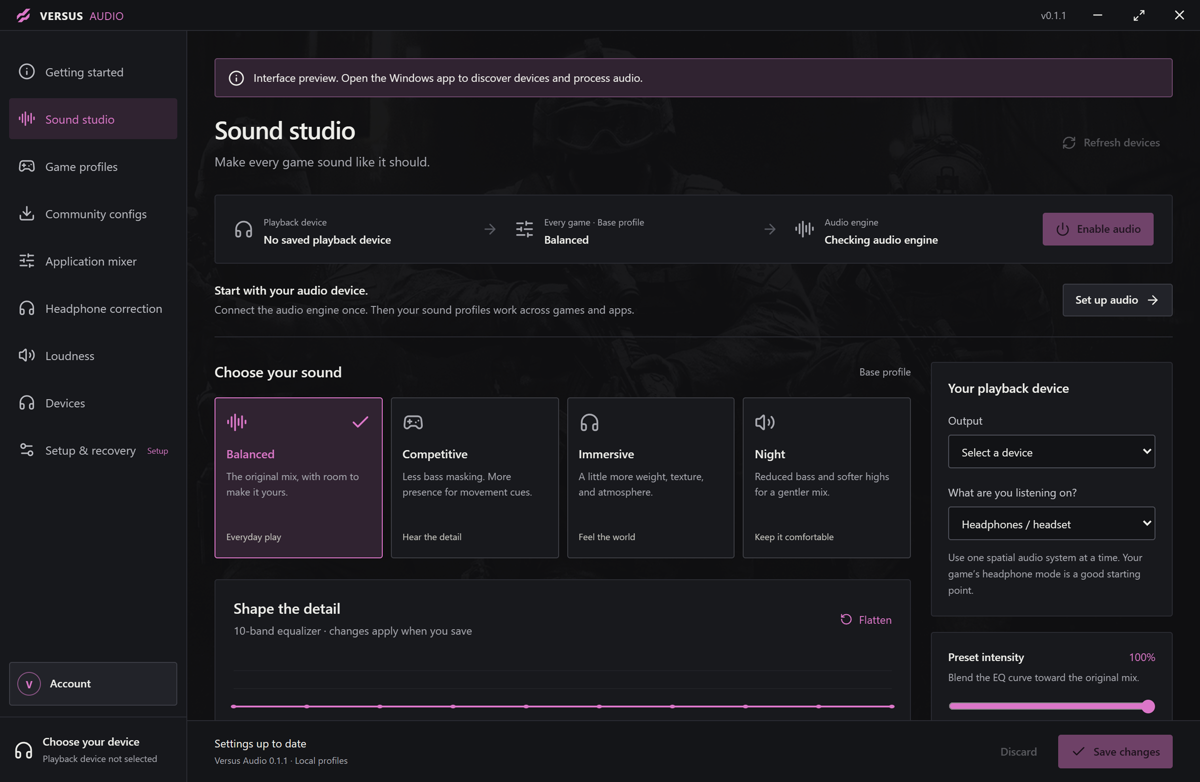
Direct answer: On Windows, open Versus Audio, pick the playback device you actually hear in Sound studio / Appareils (that selection does not change the Windows default), decide Application mixer vs Sound processing (EQ), and only for EQ install Equalizer APO separately, follow the four Setup & recovery steps, then Connect engine. Start from Balanced, Competitive, Immersive, or Night, set Preset intensity, shape the ten bands if needed, save a base profile plus Game profiles against the game’s executable filename, then Bypass to A/B — or Disconnect & restore when you want the managed engine config gone. Mixer works without APO. Audio is free. No Remap or VPN plan required.
This is the Versus Audio product Windows Guide — player-first suite series, same lane as the Mate and VPN first-session posts. It is not the SEO Equalizer APO preset deep dive (Equalizer APO Gaming Preset: How to Tune FPS Audio Without Guessing). Soft-link that sibling for FPS-preset judgment and keep-APO honesty. Mate Application audio is a different product — session volume inside Mate, not this EQ studio (Mate Application audio guide).
What Versus Audio is
Versus Audio is a free Windows app on one Versus account. Two jobs — keep them separate:
Application mixer — per-app Windows volume and mute. Works without the EQ engine.
Sound processing (EQ) — ten-band curve on the selected output, with presets, intensity, Bypass, and per-game rules. EQ uses Equalizer APO, installed separately. Versus installs no driver and never restarts your PC.
Step 0: Free access — Set up Audio
You do not need a paid Remap or VPN plan.
- Open Versus Audio on Windows.
- Choose Sign in with Versus. Approve the PC in the browser (Match this code in your browser), then return.
- Product entry is Set up Audio / Help — not a download-now binary promise. Catalog status is current; there is no public installer URL to promise here.
Profiles stay on this PC. Audio does not spend coins. Recovery without sign-in still exposes Bypass and Disconnect engine.
Step 1: Pick the playback device
In Sound studio ou Appareils, select the playback device you actually use: Headphones / headset, Earphones / IEMs, Speakers / soundbar, or Autre.
Selecting an output tells Versus where to apply EQ. It does not change the Windows default device. Refresh devices if the list is stale. Optional Left / Right / Mono / Stereo test tones help confirm the path. Make sure the game uses the same output. Exclusive mode and ASIO can bypass this processing path — if EQ seems dead while the mixer still works, check that first.
Step 2: Two jobs — decide mixer vs EQ early
Need Discord louder and the browser quieter? Stay in the Application mixer. No APO required.
Need a Night curve, clearer footsteps, or a saved profile per title? That is Sound processing. APO comes next. Different controls. Different jobs.
Step 3: Application mixer (no APO)
- Start sound in the game, voice chat, or browser you care about.
- Ouvrir Application mixer → Refresh apps.
- Use Find an application when the list is long.
- Move the session control → Régler le volume, or Mute / Unmute.
Rows show the application, Windows playback device, and Playing or Idle. Mixer changes remain after Versus Audio closes. They do not rewrite Sound studio EQ profiles.
Step 4: EQ path — Equalizer APO + Connect engine
EQ needs Equalizer APO installed separately. Open Setup & recovery and follow the four displayed steps only as Help shows them:
- Official download → install APO → attach playback (and any mic you intend to process) in APO’s device selector.
- Return to Audio; Select devices if endpoints need changing.
- Connect engine — status: Engine not detected, Engine detected, or Configuration connected.
- Open studio → Enable → verify an audible change with a familiar sound.
A connected configuration alone does not prove processing — verify by ear. Use Bypass to compare. Audio backs up the existing APO config before writing its managed include. Do not invent installer click-paths beyond Official download and those four displayed steps.
Step 5: Presets, intensity, ten bands
Start from Balanced, Competitive, Immersive, or Night. Use Preset intensity to blend toward the original mix before you redraw every band.
Ten bands: 31, 62, 125, 250, 500, 1k, 2k, 4k, 8k, 16k Hz. Each band −12…+12 dB in 0.5 dB steps, or Flatten toward Custom. Enregistrer les modifications after reviewing automatic headroom for boosts.
Match loudness when you Bypass. Louder almost always “sounds better.” Judge shape, not gain.
Step 6: Base profile + Game profiles
Keep a base profile for everyday listening. Give a title its own sound under Game profiles.
Audio switches by the running executable filename (case insensitive). It does not inject into the game or change game files.
- Rescan games → Trouvez votre jeu → Add profile (or Add any game with Game name + Executable name).
- Tune profile, then turn on Switch automatically for matching rules.
- Review Saved game rules; executable filenames can be comma-separated.
Up to 100 saved game profiles. If auto is off or no filename matches, base remains. Keep Audio running for automatic switching.
Step 7: Close the app, Bypass, Disconnect & restore
Close the app and the last written EQ stays. Automatic game switching needs Audio open.
Bypass stops processing while keeping the saved profile. Disconnect & restore bypasses and restores the previous Equalizer APO configuration. Enable only after the engine is connected and an output is selected.
Optional: Headphone correction (honest)
Headphone correction stays bound to the selected output. Load the catalogue, search (≥2 characters), Preview, Assign — or Import a supported ParametricEQ.txt.
Catalogue entries are starting points from published measurements — not individual measurement or certification. Match the exact model and listening mode.
Console note (one line)
Remap and Audio: console use requires a Windows PC or laptop. Not a standalone console audio client. No console share how-tos beyond that Windows-in-path note.
Soft links
- APO SEO sibling: Equalizer APO gaming presets — FPS preset judgment; unlimited parametric / convolver / system-wide chain stay with APO.
- Product + comparison: Versus Audio · Equalizer APO et Versus Audio
- Help: Audio · Connect APO · EQ · Game profiles · Enable / Bypass / restore · Appareils · Mixer
FAQ
Is Versus Audio free? Do I need Remap or VPN?
Yes. Free. No paid Remap or VPN plan required.
Do I need Equalizer APO?
For EQ processing, yes — installed separately. The application mixer works without the EQ engine. Versus installs no driver and does not restart your PC.
Does selecting a playback device change my Windows default?
No. It tells Versus where to apply EQ. Confirm the game uses the same output.
What happens when I close the app?
Last written EQ stays. Auto game switching needs Audio open. Use Bypass or Disconnect & restore to stop processing.
Will EQ raise my FPS or lower ping?
No. No honest EQ claim ties to frame time or network latency.
Can I use this on PlayStation or Xbox alone?
Needs a Windows PC or laptop in the path. Not a standalone console audio client.
Can I download Audio as a public .exe from this post?
Follow Set up Audio / Help. This post does not promise a public installer binary URL.
Soft next step
Ouvrir Versus Audio, pick the device you hear, settle mixer vs EQ, Connect the engine through Help’s four Setup & recovery steps if you want the curve, save a base + one executable game rule, Bypass at matched loudness, and keep Audio running for auto-switch. Click paths: Audio Help. APO-first preset judgment: Equalizer APO gaming presets.
Pick the device. Split the jobs. Verify by ear. Queue after Bypass still sounds like an upgrade.